AWS Client VPNを、Azure ADとのSSOで利用する
AWS Clinet VPNを、Azure AD側ユーザーにてシングルサインオンして利用する手順を確認しています。AWSとAzureそれぞれで、必要手順を紹介しているページがあります。
AWS側の資料はこちら。
How to Integrate AWS Client VPN with Azure Active Directory
Azure側の資料はこちら。
チュートリアル:Azure Active Directory シングル サインオン (SSO) と AWS ClientVPN の統合
Azure AD側での作業
前提情報です。
・AWS ClientVPN では、SP Initiated SSO がサポートされます
SP Initiated SSO とは、以下認証フローとのこと。
ユーザーがSPにアクセスすると、SPはそのリクエストをSAML認証要求と共に、IdPへとリダイレクトします。IdPはこの認証要求に基づき、ユーザーの認証処理を実行します。IdPでのユーザー認証が成功すると、IdPはSPに対して認証情報やユーザーの属性等の情報を発行します。

・AWS ClientVPN では、Just-In-Time ユーザー プロビジョニングがサポートされます
Just-In-Time ユーザー プロビジョニング とは、以下とのこと。ユーザーがログイン処理した時に、SP側でユーザーを作成するよ、ぐらいの認識です。
Just-In-Time (JIT) provisioning enables automatic user account creation in Okta the first time a user authenticates with Active Directory (AD) Delegated Authentication, Desktop SSO, or inbound SAML.
Add and update users with Just-In-Time provisioning
Azure ADにAWS Client VPN用アプリの設定
Azure AD側で、AWS Client VPNとSAML連携用アプリを作成します。ActiveDirectory Federation Serviceで設定するような内容を、ここで設定するイメージとなります。
Azure ADのホーム画面より、左ペインの「Enterprise applications」を選択。
「New application」をクリックします。

検索フォームで AWS ClientVPN と入力すると、AWS ClientVPNのアイコンが表示されるのでクリックします。

Nameフォームに適当な名前を入れて、「Create」をクリック。

まず、このSAML連携を利用できるADユーザーを登録します。表示された画面のGetting Start内の「Assign users and groups」をクリック。

「Add user/gourp」をクリック。

Usersを選択。表示されているWarningはAzure無料版だからです。

利用させたいユーザを選択して、「Select」をクリック。

「Assign」をクリック。

続いてSSOの設定を入力します。左ペインの「Overview」をクリックして、Getting Start内の「Set up single sign on」をクリックします。

「SAML」をクリック。

①の「Basic SAML Configuration」で以下の値を設定します。
| パラメーター | 値 |
|---|---|
| Identifier (Entity ID) | urn:amazon:webservices:clientvpn |
| Reply URL (Assertion Consumer Service URL) | https://127.0.0.1:35001 |
| Sign on URL | https://127.0.0.1:35001 |
| Relay State | (ブランク) |
| Logout Url | (ブランク) |
SP Initiated SSOの認証フローであるゆえ、 Sign on URL が求められるのですが、AWS Client VPNにログインWEBページなんてないぞ、と混乱しました。こちらは Reply URL と同じ値でいいようです。

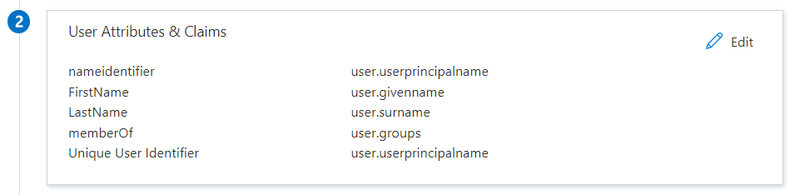
②の「User Attributes & Claims」で、以下の通りクレームを登録します。
| Claim Name | Value | 備考 |
|---|---|---|
| nameidentifier | user.userprincipalname | |
| FirstName | user.givenname | |
| LastName | user.surname | |
| memberOf | user.groups | group claimの All groups の Group ID |
| Unique User Identifier | user.userprincipalname |
③の「SAML Signing Certificate」にて、SAML署名証明書の設定を変更しておきます。「Edit」をクリックします。

「Signing Option」で、「Sign SAML response and assertion」を設定しておきます。

コンフィグファイルを直接いじってSAML定義を修正必要な箇所があり、コンフィグファイル(マニフェストファイル)を、Azureポータル上で開きます。Azure ADのホーム画面に移動し左ペインの「App registrations」を選択します。「All applications」に、これまでに作成したAWS ClientVPNのAppsがいるので、クリックします。

左ペインの「Manifest」をクリックします。

以下にようなJSONのコンフィグファイルが表示されるので、 replyUrlsWithType の url のプロトコルを「https」から「http」に変更します。これは、AWS Client VPNのACS(Assertion Consumer Service) URLがHTTPプロトコルのみサポートしているために必要となる作業となります。

最後に、「Enterprise applications」の作成したAWS ClientVPNのapp画面に戻り、Federation MetadataのXMLファイルをダウンロードしておきます。

AWS Client VPNの設定
AWS側での設定を実施します。
IAM Identity Providerの作成
上記でダウンロードしておいたメタデータファイルを利用して、SAML用のIAM Identity Providerを作成します。
$ aws iam create-saml-provider --saml-metadata-document file://"AWS ClientVPN Sample.xml" --name azure
AWSはServiceProvider側なのに、IAM Identity Providerとか、まるでIdPであるかのような紛らわしい名前なのですが、実施していることはAzure AD側との信頼関係を結ぶ(つまり証明書利用者信頼の設定をしている)だけになります。
AWS Client VPN用のサーバー証明書の作成
AWS Client VPNで利用する自己署名のサーバー証明書を作成します。公式ドキュメントにて easy-rsa を利用した手順書が紹介されており、それに沿って実行しています。
$ git clone https://github.com/OpenVPN/easy-rsa.git

$ cd easy-rsa/easyrsa3

$ ./easyrsa init-pki

$ ./easyrsa build-ca nopass

$ ./easyrsa build-server-full server nopass
作成した証明書一式をACMにインポートします。
$ aws acm import-certificate \
--certificate fileb://pki/issued/server.crt \
--private-key fileb://pki/private/server.key \
--certificate-chain fileb://pki/ca.crt
AWS ClientVPNの作成
AWS ClientVPNを作成します。以下、作成用のCloudFormationです。
AWSTemplateFormatVersion: 2010-09-09
Description: "CFn for Client VPN"
Metadata:
  AWS::CloudFormation::Interface:
    ParameterGroups:
      -
        Label:
          default: "CFn for Client VPN"
        Parameters:
          - ClinetVpnName
          - ProviderName
          - ACMIdentifier
          - VpcId
          - Subnet
          - VpnCidr

Parameters:
  ClinetVpnName:
    Type: "String"
  ProviderName:
    Type: "String"
  ACMIdentifier:
    Type: "String"
  VpcId:
    Type: "AWS::EC2::VPC::Id"
  Subnet:
    Type: "AWS::EC2::Subnet::Id"
  VpnCidr:
    Type: "String"
    Description: "Client cidr block must be at least a /22 range"

Resources:
  CloudwatchLogGroup:
    Type: "AWS::Logs::LogGroup"
    # https://docs.aws.amazon.com/AWSCloudFormation/latest/UserGuide/aws-resource-logs-loggroup.html
    DeletionPolicy: "Delete"
    Properties:
      # KmsKeyId: String
      LogGroupName: !Sub /aws/clientvpn/${ClinetVpnName}
      RetentionInDays: 30
  CloudwatchLogStream:
    Type: "AWS::Logs::LogStream"
    # https://docs.aws.amazon.com/AWSCloudFormation/latest/UserGuide/aws-resource-logs-logstream.html
    DeletionPolicy: "Delete"
    DependsOn: "CloudwatchLogGroup"
    Properties:
      LogGroupName: !Ref CloudwatchLogGroup
      LogStreamName: !Ref ClinetVpnName
  Endpoint:
    Type: "AWS::EC2::ClientVpnEndpoint"
    # https://docs.aws.amazon.com/AWSCloudFormation/latest/UserGuide/aws-resource-ec2-clientvpnendpoint.html
    DependsOn: "CloudwatchLogStream"
    DeletionPolicy: "Delete"
    Properties:
      AuthenticationOptions:
        - Type: "federated-authentication"
          FederatedAuthentication:
            SAMLProviderArn: !Sub arn:aws:iam::${AWS::AccountId}:saml-provider/${ProviderName}
            # SelfServiceSAMLProviderArn: String
      ClientCidrBlock: !Ref VpnCidr
      # ClientConnectOptions:
      #   Enabled: Boolean
      #   LambdaFunctionArn: String
      ConnectionLogOptions:
        Enabled: True
        CloudwatchLogGroup: !Ref CloudwatchLogGroup
        CloudwatchLogStream: !Ref CloudwatchLogStream
      Description: "sample"
      # DnsServers:
      #   - String
      # SecurityGroupIds:
      #   - String
      # SelfServicePortal: Boolean
      ServerCertificateArn: !Sub arn:aws:acm:${AWS::Region}:${AWS::AccountId}:certificate/${ACMIdentifier}
      SplitTunnel: False
      TagSpecifications:
        - ResourceType: "client-vpn-endpoint"
          Tags:
          - Key: "Name"
            Value: !Ref ClinetVpnName
      TransportProtocol: "udp"
      VpcId: !Ref VpcId
      VpnPort: 443
  Association:
    Type: "AWS::EC2::ClientVpnTargetNetworkAssociation"
    # https://docs.aws.amazon.com/AWSCloudFormation/latest/UserGuide/aws-resource-ec2-clientvpntargetnetworkassociation.html
    DependsOn: "Endpoint"
    DeletionPolicy: "Delete"
    Properties:
      ClientVpnEndpointId: !Ref Endpoint
      SubnetId: !Ref Subnet
  Authorization:
    Type: AWS::EC2::ClientVpnAuthorizationRule
    # https://docs.aws.amazon.com/AWSCloudFormation/latest/UserGuide/aws-resource-ec2-clientvpnauthorizationrule.html
    DependsOn: "Endpoint"
    DeletionPolicy: "Delete"
    Properties:
      # AccessGroupId: String
      AuthorizeAllGroups: true
      ClientVpnEndpointId: !Ref Endpoint
      Description: "for internet"
      TargetNetworkCidr: "0.0.0.0/0"
  VpnRoute:
    Type: "AWS::EC2::ClientVpnRoute"
    # https://docs.aws.amazon.com/AWSCloudFormation/latest/UserGuide/aws-resource-ec2-clientvpnroute.html
    DependsOn: "Association"
    DeletionPolicy: "Delete"
    Properties:
      ClientVpnEndpointId: !Ref Endpoint
      Description: "for internet"
      DestinationCidrBlock: "0.0.0.0/0"
      TargetVpcSubnetId: !Ref Subnet
接続テスト
実際にVPN接続してみます。
AWS提供のクライアントモジュールが公開されており、未インストールの場合にインストール。
ClientVPNのコンソール画面より、作成したClientVPN設定のコンフィグをダウンロードしてきます。

ダウンロードしたコンフィグを開いて、ファイル内に記載されているCA証明書部分を、前述で作成したものに変更します。以下の部分です。
cipher AES-256-GCM
verb 3
<ca>
-----BEGIN CERTIFICATE-----
MIIDSzCCAjOgAwIBAgIUa+/Z+wG2DhFeX3MY2LrYu04eJX8wDQYJKoZIhvcNAQEL
BQAwFjEUMBIGA1UEAwwLRWFzeS1SU0EgQ0EwHhcNMjEwMzI1MDkwMDUzWhcNMzEw
MzIzMDkwMDUzWjAWMRQwEgYDVQQDDAtFYXN5LVJTQSBDQTCCASIwDQYJKoZIhvcN
AQEBBQADggEPADCCAQoCggEBALMqsn5EnmeS16pN3tBWKkHe6o+nNnybey7fZNro
lsuGiznEskhOIuKYAP64POQwZo1Qm2rFTLHF89Z+VECkSuzTNKErL/2mJAo9bbFv
Gg2qD8CTDeUFUEonBIVRRLNuDuMgWO9TDxSgx5JaXvNCpE0tCwDv/WNNRC4ODz8s
OX5G8CbsRpTH23be863JsREFLOOHpdvbFAM8xKGMh74csuvtXOafcXDOLAu4n4h5
NXNDoehqXYtlRAOwHYqEDoUinCXEAEI5+xThOUOUfYqi/dqNxpK1GsJ5b2L1ztwp
zllNr5B45Ps18YEIvPhVICbcfHEBoRo6HOY6bRQFUIzCOD0CAwEAAaOBkDCBjTAd
BgNVHQ4EFgQU/nx1hrU9ZRwra4WfUEUZj0jmG0kwUQYDVR0jBEowSIAU/nx1hrU9
ZRwra4WfUEUZj0jmG0mhGqQYMBYxFDASBgNVBAMMC0Vhc3ktUlNBIENBghRr79n7
AbYOEV5fcxjYuti7Th4lfzAMBgNVHRMEBTADAQH/MAsGA1UdDwQEAwIBBjANBgkq
hkiG9w0BAQsFAAOCAQEAHTZKqcRqlmqDFQ3AmidyxLITtwcbYU0Q9NvQZoQfaDrY
pIlqd50G6sLszJkBHhobkGYxyWhuZ1Qwv0zrafzkrI+soKzTxK/z94gK7KW5XPln
RR4QC8EhRxtcox7nYEg7JhBg2gOLmJirTHMnWF7wNdlLqgOTN5+UjezZ+oKYlMb3
qOoDSQKkxNLy5G+ebn8wtGUFgBrVrgt2JGx+J0QfTXq0H0YgPFWTb35F4jzTw79v
FNv+GQh8kCy4FnC96DWHhsyDqJqfPvWO/7GiYa5lQLb2K1f9hXNlukcy+XMrw8LC
rB1jU4iSi1skIc3v4MLPb8mLNAM6SkDB2DsbqK5alg==
-----END CERTIFICATE-----

</ca>
ClientVPNのAgentを起動させて、上記で編集したコンフィグファイルを食わせてあげます。
食わせたコンフィグの定義を利用して、接続してみます。

ブラウザが立ち上がって、Microsoftのサインインページが表示されるので、SAML連携の許可設定をしたユーザー情報を入力します。

サインインできると、ClientVPNも接続できます。

試しに、利用しているグローバルIPを確認を確認すると、AWS側提供のIPアドレス(いつもとは違うIPアドレス)になっているはずです。